In 2010, Gary Jones posted these personal memories written below on the “Sax on the Web” saxophone forum. Gary shared these recollections from his first three lessons with George, a graduate student who personally studied with Joe Allard in the 1970’s. He happily gave me permission to post his memories here also.
This is what Gary Jones shared about these first three saxophone lessons:
“I decided to post a link to these written Joe Allard school saxophone lessons I made for someone. They are basically what I remember of the first basic concept lessons from the old Juilliard school saxophone department. My teacher, George, was a graduate student in the Juilliard saxophone department at the time of the lessons and one of Joe Allard’s best students.
Only one saxophone student was accepted to do graduate work at Juilliard each year.
These lesson recollections might be helpful for someone who wants to transition to the Allard school of saxophone playing or if someone just wants to understand various Allard school exercises like overtone exercises in the proper original context. I’m not sure I have ever read these basics put together in writing before but one will often read about the overtone exercises out of context.
The reed making concepts were also totally mind blowing. In the process of trying to teach it to me, George would make me the best reeds I have ever played. I would bring in the reed I was working on and it didn’t play well at all. In about 3 minutes, George would fix it and make it perfect. It was bizarre, He would hold it up to the light and say something like here is the problem, see this fiber right there, it’s stiffer than the others so you have to cut that one out. Then the reed would play perfect. One of the reeds he adjusted for me lasted like 3 months! Best reed I ever had! I totally never understood what he was saying and to this day I never figured it out. It was like he was doing some kind of magic.
These lessons took place in the late 70s. These are only the basic concepts and will suffer some loss in written form. Everything that came afterwards revolved around these basic ideas though. Writing these memories out, helped me reconnect with the past and the fundamentals. The process of remembering and writing them out also helped me move forward a bit. These very simple concepts really take years to unfold and sink in. Even today, they still effect my playing in a positive way.-Gary Jones
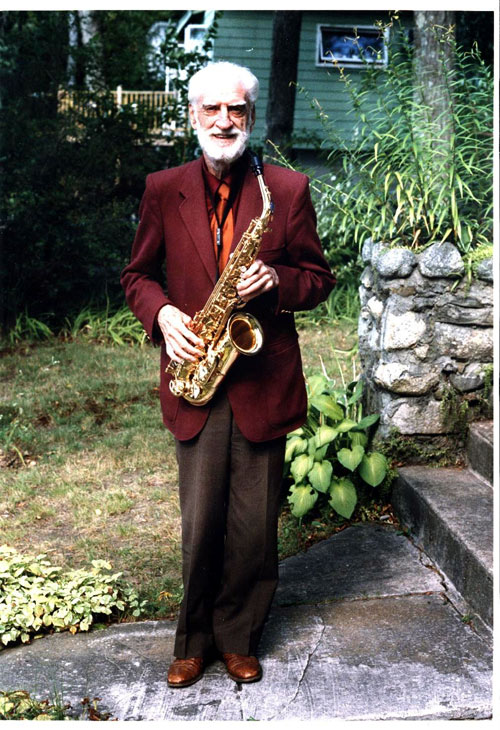
The Esteemed Saxophone Teacher Joe Allard
Joe Allard (December 31, 1910 – May 3, 1991), a native of Lowell, MA, was a famous saxophone and clarinet professor at Juilliard, The New England Conservatory and The Manhattan School of Music. Some of his most famous students were: Michael Brecker, Eddie Daniels, Bob Berg, Dave Liebman, Paul Winter, Steve Grossman, Kenneth Radnofsky, Bill Pierce and many many others.
I found reading these memories from Gary Jones both fascinating and enlightening. Many of the tips on working with saxophone reeds I had never heard before. I love how relaxed it all feels when you’re reading it. The more relaxed and natural everything is the better. Thanks so much to Gary Jones for writing this out and making it available to the saxophone community!
*Note: I have edited Gary’s account of the lessons below slightly to make it easier to read in 2021 (ten years after I posted it) by adding punctuation, paragraphs and correcting some grammatical errors. I tried to keep the original thoughts and intentions of Gary’s writings as close to the original as possible.-Steve
Lesson 1
First thing, is to do this exercise for a week with just a reed, no mouthpiece and no horn:
Holding the end of the reed in your hand, place the reed on your lower lip like you are going to play it. Just let it rest there. Relax your mouth totally so there is no tension in your lip at all.
Your lip should be straight across and slightly turned over the top of your lower teeth. There should be no downward tension on the reed, it should just lay there. The only tension on your lip is the slight weight of the reed and reeds aren’t very heavy. Your lower lip goes right against your teeth with your lip as an uninvolved cushion between reed and teeth.
Open your mouth like you have an invisible mouthpiece in there. Now practice blowing over the reed like that, just like you are playing the reed on an invisible mouthpiece. Use your lungs to push air but don’t involve any of the muscles in your mouth or face. When you blow over the reed your lips and mouth shouldn’t respond in any way. The most important thing, is that your lower lip doesn’t respond by curving around the sides of the reed in any way. No clamping down on the mouthpiece because there isn’t any mouthpiece there to clamp down on. Your bottom lip is completely relaxed like you are asleep. Practice blowing like that. This is what it should feel like to blow the saxophone. Keep a reed in your pocket and practice this exercise a lot.
The other important exercise from the first lesson was breathing exercises.
We were in an urban environment where we walked a lot but you could just as easily do this sitting down. When you are walking, breath in through your nose for five steps. Then, hold your breath for five steps. Finally, breath out through your mouth for five steps. Eventually, work your way up to 20 steps in, 20 steps hold, 20 steps out. You might like to do some empty counts after the exhale and before the next inhalation.
As the air goes out, you can restrict and control the flow by pursing your lips like a flute embouchure. The exhalation should be like playing an even steady long tone. If you practice this while stationary, just pace your breathing by counting imaginary steps like you are walking at a moderate walking pace.
This is to develop good breathing but also for relaxation both mentally and physically. You can’t play music if your head and mind are full of mental chatter. Later, for added layers of concentration, you can count repetitions. You could for instance do three groups of 12 different 20 count cycles or some other variations similar to that.
This type of mindfulness would correspond to the multiple layers of concentration needed to keep track of complex jazz forms. One of the things we are trying to do is to make more seamless the union of mind and body.
The goal is for you to hear or think a sound and it comes out of the horn, just like speaking. The breathing exercises are yoga exercises. Yoga means union.
Eventually, the head space the breathing exercise puts you in, starts to become a mental state you learn and can use when you play.
In keeping with this theme, there was a hatha yoga pose to practice that first lesson. Much to my surprise, I was instructed to get on my back on the floor in the practice studio and do the sivananda yoga posture Setubandasana “the bridge” or “bridge-building pose”. (bridge the gap between body and mind)

Its basically about opening up and stretching your lower abdomen. Concentrate on how you are breathing when you practice this. Learn to breath in deeply by drawing your diaphragm down. Only at the end of your inhalation is there a need to expand the chest. It’s important to do the exercises, but also to understand the reason why you are doing them.
At the end of this first lesson, George told me to get the book “Top Tones for the Saxophone” by Sigurd Rascher and to get a single bevel reed knife.
Lesson 2
Ok, so now that we have the proper embouchure, it’s time to put the reed on a mouthpiece. First we have to prepare the reed. This is going to be hard to describe, but the purpose of this is to get the reed to seal properly.
Soak a new reed in a glass or bowl of fresh water for 15 minutes and then lay it out on a mantle or table somewhere upside down to dry. After it dries, lay it upside down on your left index finger. It might help to wet your finger so the reed will stick.
Hold the reed knife in your right hand and put it on the reed near the bottom of the back of the reed. Put your left thumb behind the knife blade for support.
With a counter clockwise twist of you right wrist and with your thumb for guidance and support for the blade, work the table of the reed until it is flat.
Your thumb and index finger work together to control the pressure on the reed. you have to keep the knife pressure even left to right and the motion is scraping not cutting. This takes some practice.

You want to flatten about the first two inches of the reed (tenor reed). The most important part is about half way up where the mouthpiece table ends and the mouthpiece window begins. You want the whole area of the reed on the mouthpiece table to be flat and not warped or curved. You know the reed is flat, when the material comes off the reed evenly all the way across. Material will come off only the high points at first.
After you get the reed flat, get a clean piece of high quality paper and put it on a perfectly clean flat hard surface. Place the reed on the paper flat side down. Put the tips of your first three fingers along the center back of the reed and rub the reed counter clockwise in a circle 100 times to polish and seal the flat side of the reed.

Now rub your finger or thumb along the top cut side of the reed, from the vamp to the tip, to seal the top. Rub a lot, like 100 times. You are trying to seal off all the open pores on the top of the reed vamp. This will seal the reed and make it into a solid object.
A freshly cut piece of cane like all plant stems is a series of tubes. These tubes conduct air and water so an unsealed reed can’t seal on the mouthpiece properly.
At the end of your playing session, you can check the seal on the flat side of the reed. Take the reed off off of the mouthpiece carefully and look at the reed and mouthpiece. The reed should have a sharp line where the area above the mouthpiece window is wet and the fibers might be swollen. Below that, the area of the reed on the mouthpiece table, should be perfectly dry. The table of the mouthpiece should be perfectly dry.

You can, if you want, also shape the tip of the reed to fit the mouthpiece tip exactly. This will help the seal as the reed vibrates. Line the reed up to the tip but below it so you can see what it needs. Take the reed off the mouthpiece and hold a piece of very fine wet or dry sandpaper in your left hand. You can get a little stiffness out of the sand paper if you need to by making a little bit of a curve with it as you hold it in the air. Don’t put the sandpaper against something just hold it out in the air.
Now rub the tip of the reed against the sandpaper side to side (in a line edge to edge). Don’t put any stress on the reed tip. Shape the reed tip to match the mouthpiece tip.

When you put the reed on the mouthpiece line it up so a little sliver of the mouthpiece tip rail is showing above the reed.
In the actual lessons we started with Vandoren #5 reeds and worked them down to proper strength but that’s too extensive to describe here and I was never good enough at it to fully understand what was going on.
Lesson 3
OK now that we have a reed on the mouthpiece, lets play. For this week, play only the mouthpiece without the horn. Before you put the mouthpiece in your mouth, close your mouth and relax as much as possible. Feel how your tongue is against the roof of your mouth and the sides of your tongue are against your upper teeth. Now open your mouth a little and let your tongue fall down so it cuts your mouth cavity in half. Spread your tongue out so it covers your upper teeth on both sides at least partly and seals against you teeth. This does not apply to the front teeth, the tip of your tongue pulls back a little and will direct the air in between the reed and mouthpiece tip. Also, your tongue is positioned perfectly for tonguing.
Hold your hand up to your mouth and blow against it to feel how the air travels above your tongue. The air travels faster because you have reduced your mouth volume by half. Don’t put tension in your tongue when you do this. You can do it and still be perfectly relaxed.
Now, put the mouthpiece in your mouth and remember the feel from the first week of playing with only the reed. The upper teeth rest directly on the mouthpiece without any biting or pressure.
When you play, air should be leaking out of the corners of your mouth because your lower lip is straight across and not curving up the sides of the reed. Eventually, some of your upper lip might come down and fill the gap and stop the leaking but the leaking is not a concern. Use the leaking as a sign that you are doing it correctly.
The reason why this is a good thing, is because if your lip touches the side of the reed, it will kill the free vibrations of the reed. Your lower lip acts only as a fulcrum point for the reed to vibrate from. Your lip shouldn’t dampen the reed’s free vibrations in any way.
Ok, now here is the real good stuff. Practice singing a note or an interval or series of notes. Think about how your body automatically adjusts itself to make the different notes when you are singing. This is the same mechanism you are going to use to play the different notes on the mouthpiece. Never change your mouth position in any way and keep your mouth perfectly relaxed. Use the way you sing with your vocal cords to practice on the mouthpiece. Play scales, play songs, whatever. What you need to do, is imagine each note fully before you play it.
Take the mouthpiece out of your mouth and sing what you want to play. Then imagine the same sounds as they are going to come out of the mouthpiece reed combination. Then play what you imagined on the mouthpiece. When you are playing one note and you want to change to another note, develop a mental image of the new note before you try to play it. The mental image should include pitch, tone, and volume.
Now you get to play the horn. Stand up straight and imagine that you are hanging from a string that is attached to the top of your head and to the ceiling. Then use the neckstrap to bring the horn to your mouth. Find just the proper adjustment for the neckstrap. You will be surprised by how much proper posture effects tone, just like when you are talking.
Don’t hold your head too high or too low. Image you are relaxed and speaking to someone in a direct and honest way. That’s how it should feel when you play, like you are standing and talking.
Now, when you put your hands on the horn curve your fingers and put the tips of your fingers directly on the pearls. Don’t hold your fingers flat like you see so many players do. The tips of your fingers should never lift off of the keys accept when you need to use side keys or whatever.
To get a feel for this and train yourself about the way it feels, you can put a little piece of double sided tape on the pearls so your fingers stick to the keys.
Think about the amount of energy that goes into pushing down the keys. Never squeeze hard on the keys only push them closed with only the smallest amount of energy needed to overcome the springs and make the key go down.
Sing a note and squeeze something or push hard on a flat surface with just one finger and you can hear the tone of your voice change. Never lift your fingers, you never have to actively lift your fingers just withdraw the energy used to overcome the spring and let the key springs raise you fingers up as the keys open by themselves. Get a feel for this, because it’s a very powerful concept. You don’t lift your fingers, you just stop pushing down and the springs raise your fingers for you.

Top-Tones for the Saxophone by Sigurd Rascher
Now on to the book “Top-Tones for the Saxophone” by Sigurd Rascher. The main goal of this book is tone and intonation development, the secondary goal is extended range into the 3rd and even 4th octave of the saxophone. You have to work on these exercises every day and the progress will most likely be rather slow at first.
The first set of exercises on page six are long tone exercises. They are all important and well documented in the book. Outside of the instructions in the book, was the direction to practice the long tones soft to loud to soft. This is very important for developing intonation. You should practice this some each day.
When you get to the loud part in the middle of the long tone, really let the tone open up and get huge but not blasting. The main idea here is pitch so you might want to use a tuner. The pitch as you crescendo and decrescendo needs to stay perfectly steady.
Skip the exercises on page 7 about uniformity of tone, because we don’t agree with the use of pressure on the reed as presented in that exercise. The page 8 and 9 exercises on tone imagination and ear training are very important and should be done some each day. For example, you can do one line on page 9 very carefully each day and the next day start on the next line in a continual rotation.
Now comes the all important overtone exercises on pages 12 – 18. Just take a small section each day to work on. When you do the overtone exercises, it is very important not to adjust your embouchure in any way. You play the overtone exercises perfectly smooth with no breaks between notes, no articulation and no adjustments to your jaw or lips. If you use cheats like tonguing or embouchure movement then you are defeating the purpose of these exercises. The point is to develop the vocal way of controlling the tones like you practiced on the mouthpiece. Don’t worry about how these turn out at first but just try honestly to do them and let it go.
The end result, will be that you can easily present the overtone within the tone of the low note and then take away the lower tone and isolate the overtone smoothly just like you are singing. It will also be possible, in the end, to do the exercises as multiphonics by simply adding the higher notes to the lower ones and keeping the lower notes going or taking away the lower notes as you like. The purpose in doing this is to be able to control tone color like you can with your voice.
Tone color on the saxophone is a matter of adding or bringing out certain partials in the sound and lowering or decreasing others at will. Eventually this will be accomplished by simply imagining the tone you are going for. Its important to never play a note on the saxophone without first imagining the note in every aspect, tone, pitch and volume first. It is this very act of imagining the note that will bring your body on board with the mechanisms to produce the tone. Eventually, this will lead to the mind body connection we talked about earlier, where you simply have to imagine music and your body will automatically create the music for you without you having to think about it. The saxophone will eventually become just an extension of your body and therefore an extension of you mind.
Just like the long tones, the instruction, different from the book, was to also to do the overtones with all manner of crescendos and decrescendos. You will find, over time, it is easier to crescendo into a downward overtone movement and decrescendo into an upward overtone interval. You should also practice doing the opposite by changing notes downward and the very softest point in a decrescendo and changing notes upward at the very apex of a crescendo. These crescendo decrescendo exercises added to the overtone exercises will really help turbocharge the chop building aspect of the overtone exercises.
One more point, is that the overtone exercises in the book only use the low note fingerings because all notes on the saxophone are extensions of these few lower fingerings. There is never any need to do overtones on higher fingerings. It would be possible to play any music using only the few low note fingering say up to about D. It might even be a fun exercise to try to play some music using overtones and only the low note fingerings.
I think that’s about it for the first three lessons, if you follow these basic instructions you should consider yourself a Joe Allard school saxophone student.-Remembrances from Gary Jones from first three lesson with a graduate student who studied with Joe Allard

Hi, and thanks for the info.
What kind of knife blade can I use? where do I get it?
No idea…….I’ve never done this. I want to try it though!
Hi Gerado,
Just google up “Reed Knife”. You can order them online. The Graf brand ones are good.
Fascinating reading! I like the idea about using the reed alone to develop a relaxed embouchure. Thanks for sharing this.
I started to try this and was dying with my reed in my mouth and my sax on the stand. It was like a musical withdrawal haha. Yeah, I cracked after 3 days, but I’m sure the master knew what he was talking about. Much of my old teacher followed these exact principles.
Any idea how I can get in contact with Gary Jones?
Unfortunately I don’t. It’s been years since we communicated over email and I don’t have his address anymore that I can find. Steve
Thanks for this great, and super detailed description – this will be very helpful to a lot of people!
I studied with Joe Allard, every week for three years while at Juilliard and also some during the summers. Joe truly was a “reed virtuoso.” He’d ask me to bring in my worst reeds, the ones that wouldn’t make a sound – then he’d tell me one Toscanini story after another, while he went to work with that reed knife flying – and turn it into my BEST reed! It was all about first making the two sides even, then he’d take a pencil and color in a parabolic shape on the reed, then carve that away – just enough to take off the pencil. Try the reed, and repeat.
Regarding his advocacy of no pressure from the teeth, his mantra was always: “Feel the reed with your teeth!” In other words, use only enough push upward against the reed so your teeth can feel that there’s resistance there – no more! He said it to all of us so often that we’d see one another in the corridor and repeat it: “Feel the reed with our teeth, good morning!”
Joe’s overtones exercises were/are legendary, and he wrote them out for each of us by hand. I later re-did them on Sibelius, and that chart is on Dave Liebman’s website, can be downloaded for free. I appreciate Dave giving me credit for them, but they are straight from Joe:
http://davidliebman.com/home/ed_articles/overtone-warmup-excercises/
These exercises are all about the pre-hearing mindset that you talk about here. The idea is that every note that you play, should have your tongue, throat, etc. in the shape it would be to SING that pitch. Then, your body is totally resonating along with the horn – like you’re a human note! These exercises really help to find that zone.
Thanks Dave! These look awesome. I would love to hear more about Joe Allard and the different things you were taught over the 3 years. Steve
Someone asked what kind of reed knife Joe used. He used a Bhosys knife – shown for sale from Weiner Music, and you can find them on eBay. I don’t think they’re made any more.
The Bhosys knives are only beveled in one direction, for left-handed or right-handed people. When I was studying with him, he was angry that they’d sent him a shipment of left-handed knives…I’m left-handed. I had a habit of shoveling his driveway after lessons in the winter and wouldn’t take any money – he gave me one of those knives in about 1979, and it’s still sharp today.
I still have my Bhosys I got from him in 73. I have used a whetstone very gently a few times to keep it sharp. What a guy he was! Still use his teachings to this day, can still hear his voice correcting me. “Don’t be a button pusher!” Ha!
I’ve read Stan Getz went to him or knew him. If I remember correctly Stan was having some trouble and Joe tried Stan’s set and could not get the low notes out (I guess the reed was too hard). He talked to Stan about reed adjustment. I’d really be interested in knowing if Stan worked on his reeds a lot or if you was one of those take ’em out of the box and slap ’em on the mouthpiece kinda guys. Given he know JA I’m assuming he worked very hard 5 reeds down.
I’m finding more and more my sound flexibility is based on the reed that day. I’m learning to take harder reeds and cut them down to get the horn and my sound vibrating more (leaving a stiff reed very thick at the tip for example).
Could that have been Gary Jones from VCU and the Richmond area? A very talented player and, I’d like to think, a colleague and friend…George Lowery?
Another talented musician and very fine teacher @ VCU. I remember some of these ideas from lessons with him at that time.
Very interesting. The discussion about hearing what you play before you play and how this influences posture is a concept also discussed in vocal pedagogy by Donald Brinegar. He states audiation predicts posture. Here are a few quotes from Don Brinegar’s book.
“Audiation (Study of the music and internalization of the music by somatic sensory). Posture (Potential for motion, gesture, and expression).”
— Conducting Primer: Seven Principles of Choral Conducting by Donald Brinegar, Christopher Gravis, et al.
https://a.co/4IpIfr6
Hi Steve,
Its been years since this post. I wonder if you can clarify breathing technique.
I watched Joes videos and it shows excercise where ribs expand first then stomach. In this lesson stomach first then chest? Also Harvey Pittel – his studend shows on his video that only ribs and chest expand.
Jerry bergonzi inhale from bottom up?
Same goes regarding exhaling. Joe says on video that stomach goes first than ribs?
Which one is correct way?
Regards
I’m not sure which video you are referring to that says “the ribs expand first then the stomach”. If you can point me to that and the time marker I can check it out. I’ve always inhaled from the bottom up as well filling up the bottom of the lungs first and then at the end the middle and top. For me, it during that ending part of breathing in where I feel like the ribs expand out. It probably isn’t the ribs expanding but just the feeling of the lungs filling up against the ribs perhaps? Not sure. I have always does stomach first and then ribs and chest at the end. When I exhale, the stomach comes in first and then at the end, the ribs and chest.
I would like to know where that quote that only the ribs and chest expand by Harvey Pittel is also as I have never heard that. Breathing on the saxophone always involves the diaphragm and filling the bottom of the lungs full of air as far as I know.
Hi Steve,
Here Is video with Joe and in 24:45 he shows how to breath. In 25:53 the student is checking if he is doing correctly and ask Joe if his ribcage should expand First and Joe said definitively. https://youtu.be/K-0N7XETP5M
Here is video of Harvey Pittel https://youtu.be/gXOvrWrquuY
Regards
I don’t think he is meaning it expands first before the breath in or first before the stomach goes out but all these things happen at the same time. You start breathing in and the stomach goes out as the air comes in and the rib cage is expanding as the air fills the lungs.
Thank you Steve
I always thought that exhale should be reverse of inhale. But you inhale and exhale in same order.
If you lay down and do Joe exercise it force you to inhale first into ribs and expand them. I guess there is reason why Joe recommend this exercise in this yoga position…
Regarding Harvey Pittel.. I read somewhere that somebody watched Phill Woods live and said that during his gig he was like Arnold Schwarzenegger 😉 – chest up and breathing horizontal – stretching rib cage.. When gig finished -the belly came back to normal position and chest down.. This is the way which Harvey describes..
Also, Im playing with high tongue position, but watched Eric Marienthal’s lesson and he talks about open throat to “sing like Pavarotti” or like talking with very low voice – ah position.. And Snitzer and his guest on his show – Everette Harp recommend playing like yawning – means ah position..
I guess there is not only one correct way to play… we just have to search for that perfect sound and hopefully find it 😉